Fabri-Quilt New Block Blog Hop: Blue Island Tribal Block Tutorial

Hi, Today I am honored to share my entry into the Fabri-Quilt’s New Block Blog Hop. This week there is a group of 60 different quilt bloggers participating and sharing a quilt block and tutorial that they have designed. Fabri-Quilt fabric company generously provided each of us quilters with a bundle of 6 fat eighths from which we needed to use at least 3 of the colors in a  12.5 inch quilt block design. We only could use the fabrics provided. Our fabric bundle was called Watermelon Summer. I managed to use all six colors in my block design.

I would like to present my block design called Blue Island Tribal. The name of my block is a take off of a friend’s former music band’s name, Blue Island Tribe. Blue Island Tribe played reggae/rock music, which was always an odd concept for me for a band that started out in Iowa but it worked for them and they developed a good following. They even went on a USO Christmas tour and played for the troops in Japan a couple years back. The band has since disbanded but our friend who is the lead singer is working on new music and releasing an EP later this month. I was inspired to use their name as stepping off point for my block because of recent photos our friend shared of his trip to Hawaii.

SAMSUNG CAMERA PICTURES
BLUE ISLAND TRIBAL

This is what my completed block looks like. Below you will find the tutorial on how to create it and also another possible coloring option.

SAMSUNG CAMERA PICTURES
Block Concept Old School (Graph Paper and Colored Pencils)

This is my concept drawing for my 12.5 inch block. I went the old school route of getting out the graph paper and colored pencils and enlarging to regular paper so the design was easier to read. Someday I would love to have one of the Electric Quilt programs.

SAMSUNG CAMERA PICTURES
Blue Island Tribal Block Fabric Cutting Chart

I had a fat eighth ( 9 by 21 inches) of white, lapis blue, aqua, turquoise, chartreuse and coral fabrics.

Fabric Cutting Instructions:

From the White fabric:

Cut (8) 2.5 inch squares and (6) 3 inch squares

From the Lapis Blue fabric:

Cut (4) 2.5 inch squares and (4) 3 inch squares

From the Turquoise fabric:

Cut (2) 3 inch squares

From the Chartreuse fabric:

Cut (2) 2.5 inch squares and (2) 3 inch squares

From the Aqua fabric:

Cut (2) 2.5 inch squares and (2) 3 inch squares

From the Coral fabric:

Cut (4) 2.5 inch squares


Block Piecing Instructions

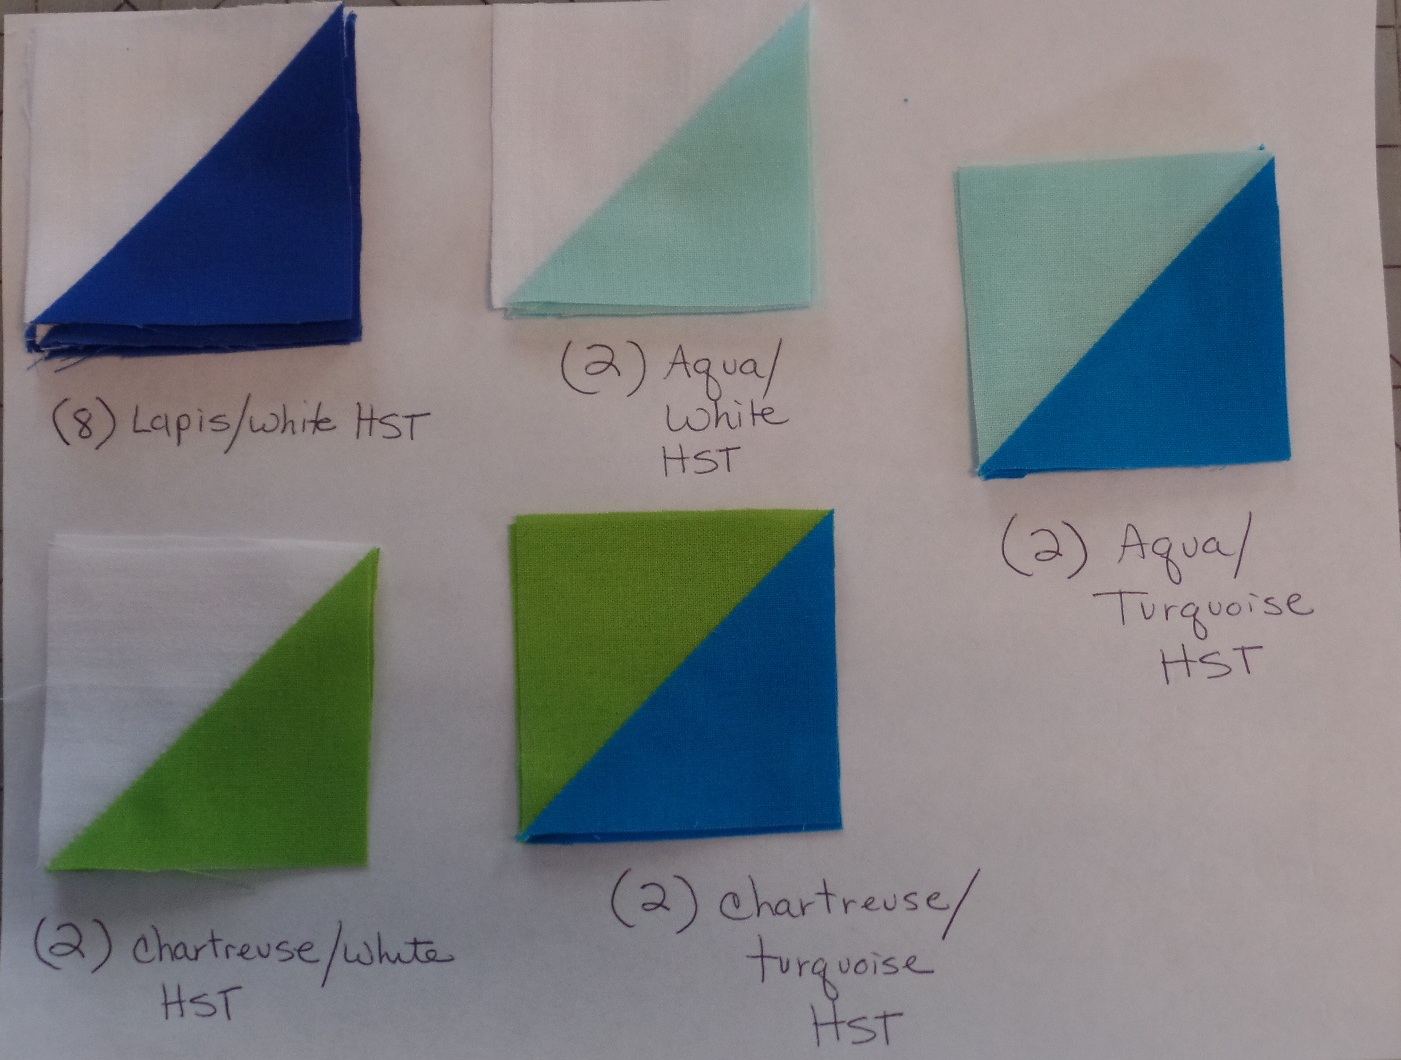
We are going to create half square triangles from the 3 inch squares and press them open and trim to the finish size of 2.5 inches.

SAMSUNG CAMERA PICTURES
How to create HST


SAMSUNG CAMERA PICTURES
Half Square Triangles Number Chart


We will be creating (8) lapis and white half square triangles, (2) aqua and white hsts, (2) chartreuse and white hsts, (2) chartreuse and turquoise hsts and (2) aqua and turquoise half square triangles.

SAMSUNG CAMERA PICTURES
Blue Island Tribal block layout

This is how we will be laying out our newly created half square triangles and the 2.5 inch squares.

SAMSUNG CAMERA PICTURES
Row 1

We will be combining these squares to make row 1.

SAMSUNG CAMERA PICTURES
Row 2

We will be combining these blocks to create row 2.

SAMSUNG CAMERA PICTURES
Row 3

We will combine these blocks to make row 3.

SAMSUNG CAMERA PICTURES
Row 4

We will combine these blocks to make row 4.

SAMSUNG CAMERA PICTURES
Row 5

We will combine these blocks to make row 5.

SAMSUNG CAMERA PICTURES
Row 6

We are combining these blocks to create row 6 which is our final row.

You will assemble the rows in order. I pressed my seams open and it helped matching my points easier. (which they all did for once.)

SAMSUNG CAMERA PICTURES
Finished Block: Blue Island Tribal


When designing this block, I drew up another color option. One just using the blues in the fabric bundle. I did a test block with fabric from my stash in blues that I had. This is the block that I tested my directions on.

SAMSUNG CAMERA PICTURES
(ALL BLUE) Blue Island Tribal
SAMSUNG CAMERA PICTURES
All Blue version of Blue Island Tribal test block


Creating my own block was a new concept for me. I have drawn out designs that I could not find an actual pattern for with some success. I have had a lot on my plate this past month, so I struggled to come up with a concept. Once I came up with the name, it was a bit easier for me to draw up a design. I all ready have plans to work up a full quilt with this block. I am thinking sashing the blocks. I drew up a Hibiscus flower applique that I thought of adding to my block. I could not make it work out in my size needed, but I kept my applique pattern and am thinking of designing a special back for the quilt for our friends’ new baby.

I would like to thank the leaders of our New Blogger’s Blog Hop group for putting together this new block creating hop. All of the 62 new blocks from the tutorials created for the Fabri-Quilt New Block Blog Hope will be sewn into quilts that will be donated to charity. Thank you to Fabri-Quilt for donating the fabric and Inspired by Fabric for help hosting this event.

Please be sure to check out all of today’s tutorials.

Here’s today’s line-up–visit them all for block inspiration!

Fabri-Quilt is giving away (8) 1/2 yard bundles of the Watermelon Summer fabrics, and you can enter on each of the blog host pages.
If you would like to go back and check out the tutorials you missed yesterday, here they are:
Thanks for stopping by my blog. Hope that you will give my quilt block tutorial a try.
Happy Sewing,
Shelley


Comments

26 responses to “Fabri-Quilt New Block Blog Hop: Blue Island Tribal Block Tutorial”

  1. Yvonne @Quilting Jetgirl Avatar

    I really like your block that uses all 6 colors from the bundle, Michelle, the color placement and changes gives the block a lot of movement. It is amazing how just a few color placement changes make such a big difference in how the block reads, too. Nicely done. 🙂

  2. Cindy Avatar

    I really like your block and can see using it in different colour ways.

  3. Lisa Avatar
    Lisa

    Great block Michelle: I love the story behind the name. The first version is really beautiful and the section in the middle looks almost translucent . I like the second version as well.

  4. Stephanie Avatar

    This is a great block!!! I’d love to see what secondary patterns it creates in a quilt.

  5. Helen Avatar

    Well worth the wait Michelle
    Love this block and the story that goes with it

  6. Cassandra Avatar

    The three color block is nice, but I love the six color version! There is so much added interest in this block with the full color palette.

  7. Cheryl Avatar

    Great block! I really like the design!

  8. Diana @ Red Delicious Life Avatar

    Really nice block. It’s amazing how different it looks when you swapped out a few of the whites in your blue test block. Looks like a completely different block.

  9. Wanda Ann Dotson Avatar

    I LOVE THIS BLOCK. I think sashing would prevent the lovely secondary pattern from appearing. What is amazing is that you have very simple HSTs and squares but I have not seen anything quite like it.

  10. Dena Avatar

    It has been a busy month for me too. I am so glad you were inspired! The block is awesome. By the way, your piecing skills are amazing. I’m not very good at piecing half square triangles. Do you have any suggestions?

  11. Brianna Robertson Avatar

    This is really pretty. I’m a huge blue fan, but I think I like the first version the best! The combination and placement of colours really makes it pop. And I like the graph paper and coloured pencil method 🙂 I have EQ7, but I still like to start with graph paper.

  12. Terri Ann Avatar

    What a great block Shelley! I love that you showed that all blue variation, this would be such a lovely block with many different colorings!

  13. Laura @ Prairie Sewn Studios Avatar

    This is great block, and I always love seeing color variations. I think you should think about getting EQ7 if you can. Mom’s got it for her birthday and she loves it!

  14. Sarah Goer Avatar

    Yours is a very interesting block. I love the six color version. It would be fun to make a quilt with a variety of color placements. This would be so easy to make scrappy!

  15. Jan O Avatar

    Very inspired block! I love how summery it looks, in both colorways. Nice clear easy to understand tutorial, too.

  16. Karen Avatar
    Karen

    Shelley, I really love this block–especially in all blue. I can see the blue waters all around that island! And thanks so much for showing how you use a chart with swatches to organize what you’re doing. As a beginner at age 67 I can use all the memory tips you’ve got 🙂

  17. Carrie Avatar

    I have seen similar blocks this but never with the 6 color interpretation and layout before. This is one I will definitely will be making!

  18. Lu Avatar
    Lu

    Wonderful block Shelly. This is beyond my capabilities but love it just the same. Thank you for the tutorial.

  19. Teje Avatar

    Hi! I love your block! I shall make this absolutely. x Teje

  20. Denise Avatar
    Denise

    I agree with Sarah, this would be an excellent candidate for a scrappy quilt. I think your blue version is a more classical look, and the watermelon palate is bolder – really like both 🙂

  21. Sandra Avatar

    Ooh, terrific block Shelley! This is getting a save on blogloin’ fo’ sho’. I really like how you can change the look of it from multi-coloured to the all-blue tones one. (my fave colour)

  22. Kathryn Upitis Avatar

    Love your block! I went the route of pencil crayons and graph paper too – one day I want to try EQ as well. I love the name and your variations. Another block that keeps on giving.

  23. Malinda Avatar

    I love your color choices! Thanks for the tutorial. I will be trying this one soon.

  24. Carie Avatar

    Oh it’s a lovely block, and with something of a nautical flag feel to it which seems apt for your friends’ band tour!

  25. Julie Stocker Avatar

    I love both blocks you’ve done, and have to add my 2 cents about EQ7. I have it, and it’s fun to play with and design, but I still go back to working the same way as you did here. There is far more satisfaction in using my graph paper and pencils so do not regret not having it. And thank you for including pressing instructions–something that it helps to know from the beginning.

Leave a Reply

Your email address will not be published. Required fields are marked *