Category: Pattern Testing

  • QIP: Plus Dash

    Hi, It’s Twentysome days into the New Year, and  I am finally getting back to quilting this week. I have basted my Plus Dash quilt top and have the first length wise row completed.
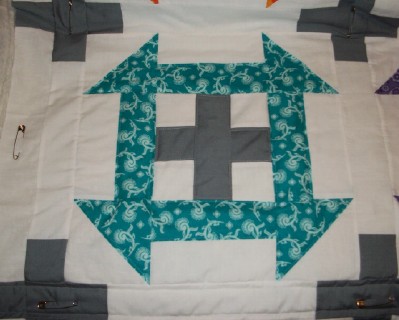
    Plusdash quiltblock

    This is a closeup of one of my favorite blocks. I really like this turquoise print. I wish I had more than the fat eighth I started this quilt with. I may have to scour the shelves at JoAnn’s to see if there is any yardage.

    It took me quite a bit of time to get the top properly basted with no wrinkles on the bottom. Our two tom cats either wanted to claim the top of the quilt sandwich as their blanket or use the blanketed dining room table as a hideaway fort so they could jump out at each other from hiding and attempt to pull the quilt off the table in the mean time.
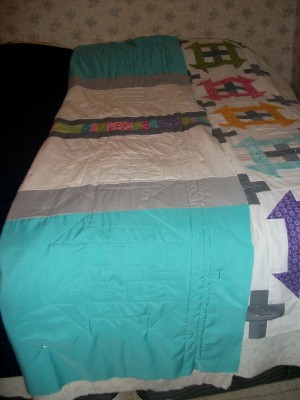
    Plus Dash QIP back row

    For the quilting, I am using my walking foot and quilting a 1/4 inch inside the shape of the churn dash and center plus signs. I have pulled matching colors for the pink, purple, orange, yellow, green and blue churn dashes. Gray of course for the pluses. I am stitching in the gray on each of the plus sashings so there will be a nice boxed framework in the design on the back. I am using gray in the bobbin. I think I waited so long to start quilting this top as I did not know how I wanted to do it. I know I need to learn how to FMQ. I know that I am going to need a different table set up to attempt it properly so I eliminate the heavy drag of the quilt, and it’s effect on the thread tension. I am using a 3.0 stitch to quilt vs. the 2.5 I usually use for normal sewing. This is a Hobbs Heirloom Cotton batt.
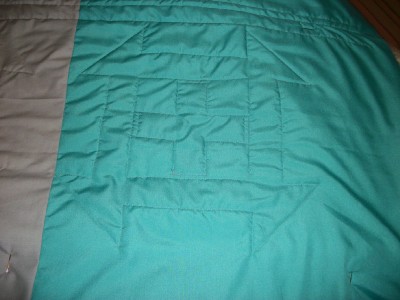
    PD quilting back closeup

    I really like how the quilting shows up.

    We finally got our King size bed this past weekend. Boy, was that a comical time attempting to get the mattress up the stairs to our second story bedroom. We had the two piece box springs, so there was no problem with that. The mattress would not clear the door trim and got wedged midway up the stairs. So tightly wedged, it would not go up or down. We ended up folding the mattress into a C shape. With lots of pulling and pushing, it finally made it’s way upstairs. Now that it is upstairs, it will not likely go downstairs in one piece, when it wears out. I was told there will likely be a chain saw coming into play. Later, I found some papers that fell off the mattress, that supposedly it is hinged someway or another, to help going upstairs. Just do not bend it further than a 45 degree angle. That would have been nice to know??
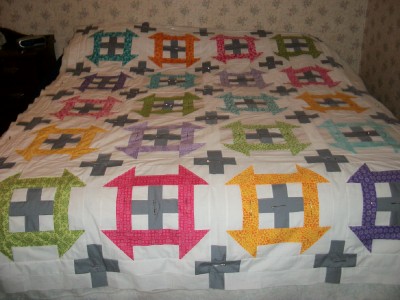
    Plus Dash QIP top

    It is nice to have a spot to lay out a quilt top in entirety. The mattress is so big that I had to climb back into the closet to get a photo. I can not wait to see this Plus Dash top done. My friend has been having an extra hard time and I am sure could really use a pick me up. This quilt is still a surprise gift to her.

    I will be linking up my QIP with various midweek linky parties.

    Thanks for stopping by this week to check out my latest quilt projects.

    Happy Sewing,
    Shelley


  • Winner of Looking Glass Pattern Contest

    Good Morning!

    We have a winner for the Looking Glass Pattern Giveaway.

    The winning comment by Sarah Craig was drawn:

    I always make my granddaughters a new quilt each year for Christmas, and so I am working on those two quilts right now. Hopefully they’ll both be finished in time to go under the tree!!

    Whoop whoop for a lovely finish – Comma is one of my favorite lines!

    I will be emailing Sarah with her copy of Looking Glass this morning.

    Thank you to everyone who entered this giveaway!


  • Looking Glass Quilt Blog Hop and Pattern Giveaway

    Hi, My name is Shelley and welcome to my blog, The Carpenter’s Daughter who Quilts. Today,  I am the last stop on the Looking Glass Quilt Blog Hop.  I hope all my US Readers had a wonderful Thanksgiving yesterday.

    I was asked by Cheryl of Meadow Mist Designs if I would like to pattern test her latest quilt design, Looking Glass. I have developed a friendship with Cheryl for over a year now, since purchasing some of her other wonderful quilt patterns. Cheryl is the one who suggested to me to start this blog. I jumped at the chance to be able to play with her new design, Looking Glass. It’s a neat design that can be made from charm squares or layer cake squares, or if you want to cut your own squares from fat quarters. It can be made in all sizes from baby to queen size.  The pattern goes together so nicely. It is very easy to assemble with chain piecing. Cheryl shows how to press your seams on your blocks and rows and everything joins up nicely in the end. I love that Cheryl’s patterns have numerous charts and tells you how many strips etc for each size of quilt you choose to make and the directions are in one spot so you can easily keep track of what you need to cut out.

    CommaLookingGlassflimsy

    I chose to make the Queen size version of Looking Glass. It ends up being 90 inches by 89.5 inches. I chose to make my top out of the Zen Chic Comma line of fabrics. I love the bold graphics and typography. These are colors that are not usually in my comfort zone. I am usually stuck in a “blue” color scheme. I used Zen Chic’s Barcelona line last year to make my Dad a quilt using Cheryl’s Adding Up Nicely pattern. The Zen Chic fabrics just have such a nice feel to them. It was a joy to sew with them. I had 5 of the Comma charm packs in my fabric stash saved for making a quilt for our bed and when I decided I wanted to use them to make Looking Glass, I had to do a major hunt online to still be able to find additional charm packs. There was not much of the Comma line available anymore.

    CommaLGFlimsysideview

    My quilt top is not quilted yet. With it being a queen size, it will be one of the larger quilts that I have had to quilt. I think I am leaning towards using rows of a curvy, scalloped scrolling pattern (if that makes sense.) I unfortunately do not FMQ yet, but will be working on that in the new year. Since this will be one of the first quilts I have saved in years to go on our own bed, I have time to make sure I pick out the right way to quilt my top.

    I do have a pieced back made for this quilt all ready. Cheryl’s instructions leave a few charm squares for you to add to your backing in a fun way, if you choose.

    lookingglass backing

    I added gray, black and white solids to make large color bands. Here is a close up of my pieced charm square center.

    lookingglass back closeup

    Now that I have shown you my version of Looking Glass, Cheryl has given all of us pattern testers a copy of Looking Glass to giveaway to one of our blog readers.

    To enter the pattern giveaway, please leave a comment telling me an item that you are making for a Christmas gift this year. If you are a no-blogger, be sure to leave your email address so we can contact you.

    For a second chance entry, let me know if you are a new or old follower of my blog. On the front page of my blog, there are links to email, Bloglovin, and Facebook. Let me know which way you are following in a second comment.

    The giveaway will run til Friday, December 5th. If you can not wait to test your chances of winning, you can purchase the pattern on Craftsy or Etsy on sale for $5.50 til December 6th. If the chosen winner by chance has all ready purchased the pattern, their purchase price will be refunded to them.

    And if you want additional chances to win check out the other stops on the hop.

    Friday Nov. 21st: Cheryl @ Meadow Mist Designs
    Saturday Nov. 22nd: Lin @ Lin’s Quilts
    Sunday Nov. 23rd: Beth @ Cooking Up Quilts
    Monday Nov. 24th: Michelle @ From Bolt to Beauty
    Monday Nov. 24th: Anna @ Fresh Dew Drops
    Tuesday Nov. 25th: Chelsea @ Patch the Giraffe
    Wednesday Nov. 26th: Shauna @ Shauna’s World
    Friday Nov. 28th: Shelley @ The Carpenter’s Daughter Who Quilts (You are here.)

    Thanks for stopping by and good luck on winning a copy of Looking Glass.

    A winner has been chosen: Sarah Craig.

    Happy Sewing,

    Shelley

  • Plus Dash Pattern Test Flimsy and Backing Pieced

    Hi, I would like to share the completed flimsy of my pattern testing of the Plus Dash quilt pattern by Jan at The Colorful Fabriholic.

    I finished up adding the last two borders to complete the outside gray pluses. I had  a bit of hard time at first “visualizing” how all the different sashing strips were going to have to go together, but once I started laying them out around my blocks then it didn’t take much to see how they pieced together the outer pluses. I have not worked with a multiple sashed quilt design in a while and this one is really cool on how it all came together in the end.

    We had our first measurable snow over the weekend just in time for the bitter cold winds and windchills to set in. I managed a couple outdoor shots of my quilt top. I was hard pressed to find a larger enough area of fresh untouched snow to lay the quilt out flat. What photos I took were as good as it was going to get by myself with the wind picking up. When I get the top all quilted, I will find somewhere to lay it out completely so I can get a full size photo. I was worried at first about the bright colors and prints and how they all would work together, but the gray and white pull everything all in nicely.

    Plusdash flimsy one

    And here is the top turned lengthwise. The wind wanted to suck the quilt through the gate.

    plusdashflimsytwo

    For the backing, I chose to use a few of my left over squares and strips to make a pieced stripe for the center of the backing. I sashed the strip with the same pewter gray, and added white, and a little gray solid(as I needed to save the last of my pewter to use in the backing for Looking Glass quilt) and pulled a light turquoise solid from my stash to add a pop of color to the backing.

    plusdashflimsyback

    Here is a close up of my pieced strip.

    plusdashflimsybackcloseup

    I will be setting this quilt top aside for a couple days so that I can quilt and finish my pattern testing of Looking Glass to meet my deadline for the upcoming blog hop for it’s pattern debut next week.

    Thanks for stopping by and looking at my quilt top. I will be linking up with various midweek linky parties.

    Happy Sewing,

    Shelley

  • Plus Dash Test Top Almost Complete

    Hi, I thought I would share how my pattern testing for Plus Dash by Jan at The Colorful Fabriholic. I have made great progress in two days. I have my top completed except for the outer two borders.

    plusdashwiptopview

    This is what I had two days ago. This laid out on my 5 foot slate top desk. I use this desk as my design wall/table. I do need to finish my design wall. I have white felt to complete it. I just need to determine a place that it will be secure to attach my wip together on it.

    Plusdashsideviewwip

    After making quilts for upwards of 20 years, I still fight alot of doubt on my color choices. I picked out these five colorations of prints in fat eighth sets almost 2 years ago. I did not know what to do with them in the end, so they stayed put in my fabric chest of drawers. When I saw that Jan was picking all sorts of prints for her version of this quilt, I decided to give these a go. It’s very bright and colorful to say the least. I do love the pewter gray pluses. I plan on giving this as a special gift to a good friend. I hope it brings some happiness and comfort to her during the hard times she is dealing with currently.

    I had a great find in my fabric stash. I found 30 precut 2 1/2 inch white strips of fabric so it made cutting out this quilt a whole lot easier. I also had some odd sized about the size of a fat quarter of white fabric that was left over from cutting borders for another quilt that I was able to cut many of the pieces I needed for this quilt. It was like winning the quilter’s lottery.

    plusdashsideborderless

    Here is one side of the quilt and after adding the last two borders, it will complete the last row of gray pluses.

    Plusdashfaveblockprint


    And this would be one of my favorite prints from the whole set of fabrics.

    I hope to get the last borders completed maybe yet tonight or most likely tomorrow. We are supposed to get some measurable snow this weekend, so it is a good time to sew and quilt. I have to make backs for my Broken Frames quilt, also for my Patriotic Square in a Square quilt and my Looking Glass quilt. I am hoping to have them quilted by Thanksgiving. Do not hold me to that, but is definitely a plan that I am shooting for. I will quilt Looking Glass first as it needs to be completed for a blog hop on the 21st, and the other two I hoped to give as early Christmas gifts to family I hope to see for Thanksgiving.

    I will be linking this wip with various linky parties this weekend. Thank you for stopping by.

    Happy Sewing,

    Shelley

  • Plus Dash Pattern Testing WIP

    Hi, I thought I would post a quick WIP report on what I am working on this week. I am pattern testing for The Colorful Fabriholic and making up a twin size version of her new pattern Plus Dash.

    I am making 20 blocks. I have 4 different prints in 5 color ranges. I found these fabrics as fat eighth sets at JoAnn Fabrics around 2 years ago. I think they have something similar still but in different color offerings. It was a hard decision for me to choose which prints to use. I did not know exactly how the larger prints of the group would work at first, but I do like how the blocks turned out. I chose to use a solid pewter gray as my crosses versus the black and white print that Jan is using to make her quilt’s pluses.

    PlusDashMockup

    Here are my teal blue print blocks.

    tealplusdash

    Here are my green print blocks.

    greenplusdash

    Here are my purple print blocks.

    Purple Plusdash

    Here are my pink print blocks.

    pinkplusdash

    And here are my yellow/orange print blocks.

    yelloworangeplusdash

    There are a lot of “happy” color prints in this quilt. I really like the pewter plus. It’s been quite awhile since I made churn dash blocks and they are quite fun. The blocks are a nice 14 inches when completed. I am definitely going to need a design wall to lay out all the sashing strips to get them in order.

    Thanks for stopping by this week and checking out my quilt projects. I will link these WIP with various linky parties.