Tag: Meadow Mist Designs

  • Looking Glass Flimsy in Zen Chic Comma prints

    Hi, I would like to share today my completed Looking Glass quilt flimsy. I am pattern testing the Looking Glass pattern for Cheryl at Meadow Mist Designs. I made the queen size version which ends up being 90 by 89.5 inches. It fits nicely over the top of our full size bed. The pattern used 7 charm packs and I used Zen Chic’s Comma. I had 5 charm packs in my stash and had to do some serious searching online to find anymore charm packs available. I found some at a quilt shop in Minnesota.

    CommaLookingGlassflimsy

    The pattern instructions were great and everything went together smoothly. I loved being able to chain piece the blocks and only having two seams to worry about matching. The only problem I had putting together the quilt was adding the long sashing. I had added a sash to the top and bottom of the bottom pieced strip and when I went to add the next pieced strip, after sewing 3/4 of the way across, I saw that I was going to be short. I almost wanted to cry when I had to tear out 75 inches of stitching. I ended up figuring out that I was going to have to pin each end and a few places across the center and then everything went together smoothly. There is nothing wrong with the instructions, just need to allow the sewing machine to ease in sashing to the pieced rows. I really like how the quilt design worked out. I really love Zen Chic’s fabrics. They have such a nice feel to them. This is my second time sewing with that fabric line  and I hope to be able to use more of her fabrics. Comma was especially fun since there were 40 different prints in the 42 charm pieces.

    CommaLGFlimsysideview

    I have to make a back for the quilt yet. I am looking at using the solid gray and black and somehow include the 14 extra charms left from the 7 charm packs to make up a pieced design. I have found an orange, yellow and lime green solids to add into the mix for interest. I am still thinking over how I want to quilt this. Maybe rows of a scalloped stitch.

    Thank you for looking at my quilt top. Please check out Cheryl’s blog as she will be offering up for sale the Looking Glass pattern in the very near future.

    I will be linking up this finish with various weekend linky parties.

    Happy Sewing,

    Shelley

  • Looking Glass Pattern Testing

    Hi, This week I am pattern testing for my friend, Cheryl at Meadow Mist Designs. She has a new quilt design in the works called Looking Glass.

    I am working on sewing up the Queen sized version. I have made a few of Cheryl’s designs before on my own, but this is the first time I have pattern tested for her. I am using my stash of Zen Chic’s Comma charm squares. I had 5 charm packs stashed away for quite awhile, and managed to purchase what may have been some of the last Comma charm squares that were available online to make up the 7 charm packs I needed to make up the Queen size Looking Glass quilt.

    LookingGlasstestpattern

    Here are eight of the blocks sewn together and laid out with the sashing.

    LookingGlassblockstest

    I have everything pieced and pressed to finish up making the 70 blocks I need for this quilt. I really like how the design goes together so nicely. Being able to chain piece everything and only have two seams to worry about matching when making the blocks is making this a fun project.

    I am working on making a pieced quilt back pulling the black and gray and adding accents of yellow, orange and lime green. I was given a deadline of November 21st, so I am looking good at completing this before that date.

    I have another quilt pattern I will be testing before Christmas for a different designer that I am working on pulling fabrics for this week too.

    Thanks for stopping by and checking out my quilts. I will be linking up my work in progress with this week’s linky parties.

    Happy Sewing,

    Shelley

  • WIP: Broken Frames Flimsy

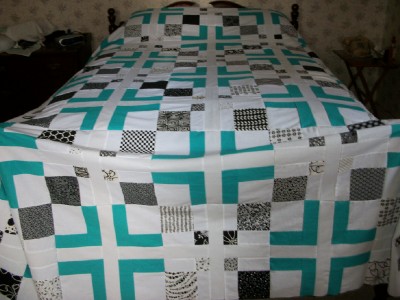
    Hi,  I would like to share my flimsy that I have been piecing this week. It is made with the Broken Frames pattern by Meadow Mist Designs. I used 39 different black and white prints and a turquoise solid fabric. I used these same prints in completing my 39 Shades of Charming quilt top made from the Charming quilt pattern also designed by Meadow Mist Designs.

    Broken Frames fullsize

    I think it is amazing how different the same fabrics can look in different quilt designs. I started with a fat eighth set of 32 fabrics (Moda’s Shades of Black) , took out the white and gray prints, keeping just the black and white prints. I purchased 12 different fat quarters and a set of 50 charm squares and throw them all in the mix to end up with a combination of 39 different black and white prints. I cut alot of charm squares obviously, since I used 120 squares in the Charming quilt, and 63 in Broken Frames and I am still left with 157 charm squares but that includes the white on white and gray on white prints. I have also a stack of 2.5 inch strips so I can probably design at least two more quilts by adding in another solid color for wow effect.

    I am back to taking photos by laying the quilt top on the bed as we have had two straight days of rain and no sun. I guess it is better than snow.

    closeup Broken Frames

    I am hoping to quilt this up for a Christmas gift.  I tend to be last minute sometimes, well actually all the time. So by starting my projects when there was 75 days before Christmas, versus 60 days or even 30 days would make me hopeful to completing more and not having to stay up til 2AM  everynight the week before Christmas. This quilt flimsy will be temporarily set aside while I test piece a quilt for a designer from New Zealand.

    I am looking forward to possibly trying a new quilting technique that Lee from Freshly Pieced will be sharing in the upcoming weeks on her  Chandelier quilt along for Bernina Sewing Machines. It looks right up my alley, no freemotion and you can use your walking foot on your domestic sewing machine.

    I will be sharing this WIP on various linky parties this week.

  • Scooby Doo Crossing Quilt: 2 Quilts Finished

    Hi, I would like to share my newly completed Scooby Doo Crossing quilts that I made for my grandson’s 3rd birthday from the Adding Up Nicely pattern by Meadow Mist Designs. I had decided to make a matching quilt for his older brother so they could be used as bedspreads on their new bunk beds. I chose to use a layer of muslin cotton yardage as a replacement to standard batting in my quilts for the boys. It is amazing how heavy it makes the quilts. My sewing machine had no problem sewing thru the three layers or four layers when quilting across the appliqued names on the back of the quilts. I have made quilts before for other children and used muslin or another cotton as the batting and they washed and wore like iron. That is something needed when sewing for little boys. My binding was 2.5 inch strips folded in half and I attached them to the backside of the quilts and pulled them to the front and sewed them down by machine. I know that is definitely not the standard way to attach a binding. I did it once by a fluke chance and liked how flat it lay and it did seem to wear nicely on the quilt.

    Scoobyclothesline

    Here is the back of the quilts with Sawyer and Shaderek’s names appliqued to the center stripes.

    Sawyerclothesline


    Shadclothesline

    For once in what seems like many years, I got my quilts completed two days before our party. It took me 2 hours to whip out the quilting on each quilt that is when I had enough bobbins wound in advance. Since I was not so rushed to take photos, I was able to attempt to be more creative in how I showed off my finished quilts. I managed to not use our bed and I found natural lighting. It is wonderful how nicer the quilts look shown this way.

    Scoobycornfieldfencegate

    Here is my Scooby Crossing quilt on the gates to our corn fields and the winds decided to pick up and catch the corners of my quilt.

    Sawyer seemed to really like his quilt as much as 3 year old can. He yelled, “Scooby” when he opened it up. I think I saw him lean over and give his name a kiss when his greatgrandma explained that it was his name on it. His brother Shad told me “that his” better not be Scooby. Well, It is! And it has your name on it too! Haha  I am sure he will warm up to the idea some day. His likes and dislikes have taken a major turn since he is in school.

    Our whole world almost came undone the day after Sawyer’s birthday party. The next day he and his brother attended a friend’s 5th birthday party and the party was held at the swimming pool at a local hotel. It was just a handful of kids and all the parents at the pool. Everything had been well, until somehow Sawyer ended up out of his floatation device and somehow fell into the pool. Sawyer was found floating face down in the water by the 5 year old’s sister who is just 10 years old.. She drug Sawyer out of the pool. He had taken on alot of water and was not breathing. Her Dad had a voice in his head tell him, that he Had to start chest compressions and CPR. Thankfully after  a couple of chest compressions and Sawyer puked up a bunch of water and started breathing again. The Paramedics were there in about 4 mins, which they told us was record time. They were so happy to be able to walk in there and find Sawyer crying. This was the best sign. They had unfortunately lost a little boy recently to a drowning at another hotel pool. Sawyer was taken by ambulance to the hospital to be checked out. The Doctors said he was looking good but one has to be so careful about the chemical burns to the lungs from taking in all that chlorine water. Pneumonia can set in within the first 6 to 8 hours and the threat of a dry drowning later. He was life flighted to our university children’s hospital. He did amazingly well and was awake and talking with the wonderful flight nurses and paramedics. He did not cry once. None of us had been allowed to fly with him. Once we got to the hospital, he was found sitting up in bed watching cartoons. He was kept overnight for observations and thankfully showed no signs of pneumonia or any other problems. He did not even need to be on oxygen when he was at the second hospital. Once we were released from hospital we knew we had our Sawyer back.  He was completely normal. Talking, singing and getting into things.

    Our family truly believes in Guardian Angels after this weekend. We will forever  be in debt to our family friends for being there and pulling Sawyer from the pool and getting him breathing again. All it takes is a blink of an eye and life can be changed forever. We are so grateful that we have our precious grandson back and can enjoy many birthdays to come.

    I will be sharing my quilt finishes with various linky parties this week.  Fabric Tuesdays,  Linky Tuesdays , Sew Cute Tuesdays , WOW Wednesdays , Let’s Bee Social,   WIP Wednesday,  Show and Tell Tuesdays,  Needle and Thread Thursday, Fresh Sewing Day,  I Quilt Thursdays ,

    Finish It Up Fridays, Show It Off Saturday.

  • WIP: Scooby Doo Birthday Quilts Appliqued Backs

    Hi, I thought I would give a quick peek and progress report on my two Scooby Doo Crossing quilts I am making for birthday gift for my grandsons.

    The second of the quilt tops was finished being pieced over the weekend. I knew I wanted to feature both boy’s names on their quilts. I have done this on a few quilts before. I made quilts for a former boyfriend of my daughter’s that had his last name on the back like a Chicago Bears jersey, quilts with the children’s names of one of our adopted deployed soldiers but my favorite had to be a Chicago Bears quilt I made jointly with my Mom for a retiring Marine Recruiter with his last name on back like the jersey and all the party guests signed the back around his name. I would have thought by now after making numerous name quilts that I would have all the letters printed out. Nope…was missing a W, which was needed for Sawyer’s name. I forgot which font I used but after a frantic search was able to recreate it. When I look at the photos I took, it appears Sawyer’s S is not sized properly. All my letters were sized the same and it is the same S as used in his brother’s name. Maybe my alignment is just a tad off but since they are all fused and machine zigzagged on, they are not going anywhere. Somehow I notched off one of the top points of my W with the scissors and did my best to fill it in with stitching.

    Sawyer Scooby Back


    Shad Scooby Back

    I feel very lucky to have been able to pull fabrics for the entire backs of these quilts from my stash. I found three shades of blue greens to make large striped components to add to the top and bottom of my appliqued name strips. I found 4 yards of black solid that I used to finish off the tops and bottoms of my back quilts. I feel it really pulls everything together. It really makes the names and Scooby prints bright colors pop out. I found the endless sewing of all the long stripes a bit tedious. I was thinking ahead and pressed the separate segments before they all were joined. The quilt backs turned out pretty cool and will make the quilts reversible. I may or may not cut out and applique the numbers 3 and 7 on their quilts yet to commemorate their birthday years.

    So today, I have to finish pressing my quilt tops and can start basting the quilts together to prepare for quilting. I found a nice yellow on yellow stripe fabric that I want to use as binding. I am going to get them all cut out today and pressed so they are ready as well. All in all I am still looking good to finish both quilts in time for the birthday party.

    Thanks for looking. I will be linking up my WIPs with WIP Wednesdays ,  Let’s Bee Social , Needle and Thread Thursdays  and I Quilt Thursdays this week.

  • ScoobyDoo Coming to a Bed Near You: WIP 1 of 2 Tops

    I thought I would bring you all up to speed on my current WIPs. I made good progress on my Scooby Doo quilts for my grandsons’ bunk beds. I am using the Adding Up Nicely pattern by Meadow Mist Designs. I have super sized the first patterns blocks  from 5 inches to 9.5 inches.

    I will admit even after 20 years of quilting experience, I still  wrestle with a lot of self doubt when it comes to picking colors and putting them together. I knew that I wanted to avoid using white or cream in my quilt top backgrounds. Our past experience with little boys and food that stains like Pop Tarts or Chocolate milk…eek. (this why I  have a stack of I Spy blocks for a quilt for them, stashed in a bin….white background, duh.) Any way, I decided to highlight some of the yellow from the original Scooby print and make it the background for my Plus/Cross blocks. As suggested by my daughter, I chose brown as the Plus/Cross blocks. Brown is a color that is out of my comfort zone. I just have not worked it into many of my quilts.

    Here is my completed Scooby Doo quilt top. It is finishing at approximately 63 by 81 inches. I really like how the Brown Crosses pop out of the yellow background. Today, I am cutting more brown fabric for my needed strips. I did not have enough of the first shade of brown, so the second quilt will be slightly different. I am still working up ideas in my head on how to create backs for the quilts. Our little guy Sawyer has not had a quilt with his name on it yet.  I am thinking of putting their names on the back to eliminate the battle of No, that one is Mine?

    ScoobyDoofirst top

    I will be linking up my WIP with WIP Wednesday ,  Let’s Bee Social , I Quilt Thursdays, and Needle and Thread Thursday.

  • Adding Up Nicely: A Finish and A WIP, Once Not Enough

    I have a great love for Cross and Plus type quilt blocks. I have been Pinning all sorts of possible quilt designs using these type of blocks to my Pinterest quilt boards.

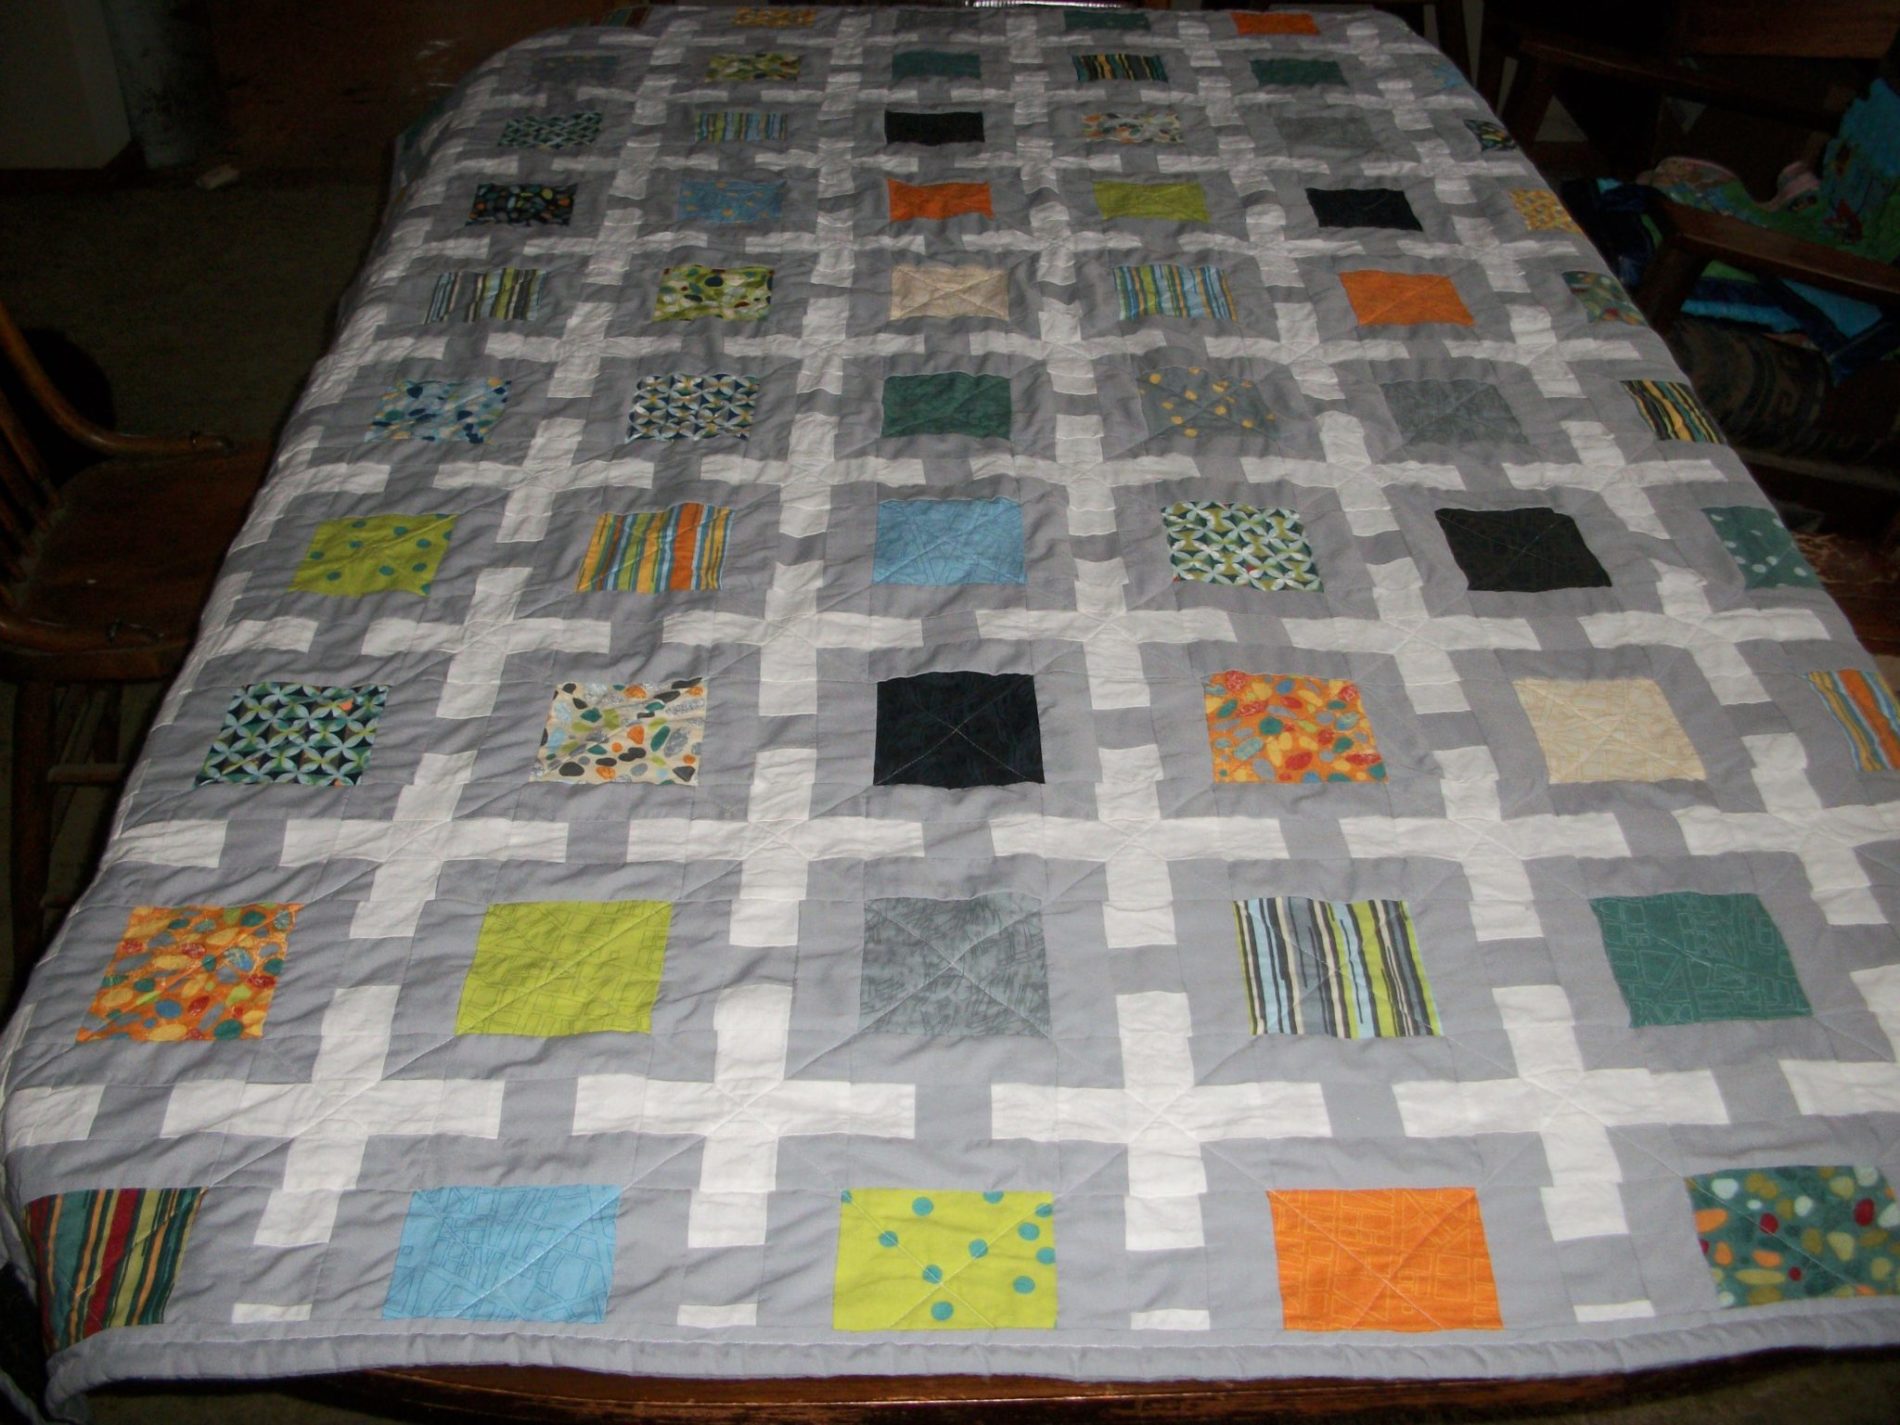
    I made an Adding Up Nicely quilt using Meadow Mist Designs pattern for a Christmas gift for my Dad this past year. I had a major dilemna in choosing fabrics to make my Dad a quilt. I was not sure what he might like. My Mom had passed away a few months earlier. I knew she loved everything blue and that was what she decorated their house in. They were married for almost 50 years and I am sure she ran the show on how the house was decorated. I did alot of looking at all kinds of fabric lines. I had seen alot of Zen Chic fabrics on Pinterest and lots of quilts made with them and loved them. I came across Zen Chic’s Barcelona line of fabrics. It had a nice range of colors from blues, greens, some black and orange. It was modern and had some really geometric designs. I especially liked the one that looks like a city map.  I needed my fabric fast as I had a fast approaching deadline. I chose to purchase from Pink Chalk. I was a first time shopper and loved the idea of a kit of two charm packs and a coordinating set of solids od generous fat eighths (were actually 10 inches wide instead of 9 inches.) The fabric came in the mail in just a few short days so I was ever so thankful.

    100_1737

    The instructions to Adding Up Nicely were great. I needed 80 charm squares to make the twin size quilt. I chose a nice medium gray solid for my sashing strips with a white background. I had one potentially big problem when sewing this quilt. It was all operator error and none of Cheryl’s instructions. I was using a new to me sewing machine that I had inherited from my Mom. I made the big mistake of not checking IF my seam allowances were right on to the needed 1/4 inch. I made up my cross blocks and they turned out nicely. The seams matched up nicely. Well, my blocks ended up smaller than my 5 inch charm squares. My seam allowance was just slightly larger so I kind of freaked out. I had to get this quilt top made. It was my major gift to my Dad. It had to work out and it had to be done like yesterday. I did not have time to completely unstitch all my blocks, so I had to do the unthinkable, and cut down my beautiful Barcelona charm squares to 4.5 inches. After carefully rotary cutting my charm squares to the needed size, my squares matched up nicely to my pieced blocks.

    100_1739

    I chose to get creative with the coordinating solid color strips for the backing of my quilt. I pieced them together and sliced them up and pieced back together. I set them in with black solid and the matching gray from the front of the quilt. I really, really like the back of this quilt. My Mom had over 25 bobbins prewound for this machine in various colors. I decided to use every last one of them in the piecing of this quilt. I used the matching gray color as my needle thread. All of the other colors as bobbin colors did not show through, but I knew they were there and it was another way to include Mom in the quilt.  I chose to just do simple Xs quilting through out my blocks. I love how quilts come out fresh from the wash and dryer. Love the wrinkly quilty goodness! I would have liked to get better photos but I was rushed to get it wrapped up and out the door for our Christmas Eve party with Dad. He loved the quilt even the back.  He even asked great questions about the fabric choices. If I put the fabrics together myself, etc?

    I am ever so thankful to have figured out my seam allowance problem, by talking over with Cheryl. With this machine, I have to use the inside of pressure foot and move the needle over a step.

    Because I liked using this pattern for this quilt, I have decided to use it make quilts for my grandsons’ bunk beds. My youngest grandson is obsessed with Scooby Doo. I found this neat Scooby Doo fabric online, but was most happy to find it in my local Walmart store. I purchased what I think was the end of bolt around 5 yards. The Scooby dog pattern ended up larger than I had originally planned for in using this design. I guess the design looked smaller on my computer screen. Cheryl at Meadow Mist Designs helped me enlarge the Adding Up Nicely block design. I am going to be enlarging my blocks up from the finished size of 5 inches to a finished size of 9.5 inches. This gives me a better way of using my grandson’s beloved Scooby Doo fabric, and not chop the poor dog up to pieces. This fabric has a lot of teal in it with black background. I usually use alot of white in my quilts, and I have learned it is impossible to keep clean with little boys. I chose to pick yellow as my cross blocks since there was so much of the teal and my daughter suggested pulling up the brown color of Scooby as the other color in my cross blocks.

    100_1827

    I have my cross blocks all pieced for the first twin size quilt. I discovered I did not have enough of my brown so I had to search for more. I was not able to get back to the store I purchased the original brown solid from, so have chosen as close as a shade as I could for my other grandson’s quilt top. I have my new brown fabric cut out into the needed strips, and am in process of making additional blocks needed for the second quilt.  I hope that these quilts will be used as bed spreads for their new bunk beds. I am looking to use a non standard choice for my quilt batting. I started quilting over 20 years ago, and for some of my quilts for nieces and nephews  I chose to use a lightweight cotton fabric as batting. It was a way to save some money at that moment. I ended up enjoying the finished product. The kids quilts ended washing and wearing like iron. I did not have too much trouble sewing through the three layers of cotton. I have made quilts for my littlest grandson for each of his birthdays. He sleeps in a pile of blankets. I thought I might change things up and make these quilts more like a thin bedspread coverlet.

    100_1828

    I will be posting updates in the future as my Scooby Doo Adding Up Nicely quilts progress. I have a deadline set of September 27th in time for little guy’s 3rd birthday party.

    I am linking up with Can I get a Whoop Whoop? linky party ,  Sew Darn Crafty Linky Party  ,  Anything Goes Mondays , Fabric Tuesday and

    Show and Tell Tuesday.


  • WIP: Charming Quilt made with 39 Black and White prints

    <a href=”http://www.bloglovin.com/blog/12532305/?claim=cgzm2p3f7fz”>Follow my blog with Bloglovin</a>

    Today I am sharing my largest Work in Progress quilting project.  It is a Queen sized quilt made from the Charming quilt pattern designed by Cheryl at Meadow Mist Designs.

    I came across Cheryl and Meadow Mist Designs last Fall, from pinning various quilts of hers to my Pinterest quilting inspiration boards. I was on a search for different cross and/or plus quilt block designs. I first come across her Adding Up Nicely and Charming quilt designs. I really liked the look of her designs and that there was many different options in either the blocks or quilt size. Cheryl has great cutting and sewing instructions.

    I had purchased a fat eighth bundle of Moda’s Shades of Black fabrics. I was looking for a design to use as many possible black and white prints. Moda’s Shades of Black fabric line has white on white, black on black, gray on white and white/black combo prints. The Charming quilt design has two quilt design options, the first would use upwards of 6 charm packs or 245 charm squares or option two allows you to add in some alternate solid color cross/plus blocks and only use 120 charm squares of your favorite prints. I chose to use the second option and add a pop of color with turquoise cross blocks.

    Moda Shades of Black strips left

    For my fabric choices, I decided to purchase extra black and white print fabrics to add more interest. I set aside the white on white and gray on white prints. I purchased a set of 12 different fat quarters and a set of 50 black and white charm squares from some Ebay and Etsy fabric sellers. This is how I came up with 39 different black and white prints in my quilt top. I cut my own charm squares from the fat eighths and fat quarters. By purchasing the extra fabrics and cutting an extra assortment of 5 inch squares to get the look I had in my head for this quilt, I now have fabric cut ahead that can be used for other quilts. I have 157 extra charm squares plus a pile of 3.5 inch strips from the fat eighths.  If I would add a totally different solid color, like lime green or pink or red, I can have endless different looking quilts.

    BW Charming FQ strips


    I spent extra time making sure I had an accurate 1/4 inch seam allowance. I had recently changed sewing machines and was creating too large of a seam allowance. I figured out it was needed to use the inside of my presser foot and moving the needle over one stop.  I am in love with the turquoise crosses in this quilt design. I think it gives just the right amount of color.

    Anizes Charming quiltfullsize

    Now my task is to figure out how exactly I want to quilt this quilt. I have made numerous quilts, but not one quite this large. I have never truly attempted free motion quilting on my domestic home sewing machines with much success.  I am quite proud of this quilt top and I want to do it justice and not just use straight line quilting and cross hatches. So today, my quilt top is setting in my to finish bin where it can stay safe and clean.

    100_1742

    I am linking up with Freshly Pieced Modern Quilts WIP Wednesday,  Needle and Thread Thursday @ My Quilt Infatuation,  And Sew We Craft Together Linky Party  and Sew Darn Crafty @Sew Many Ways.

    I am up to hearing any and all suggestions on how other quilters would quilt this design???